
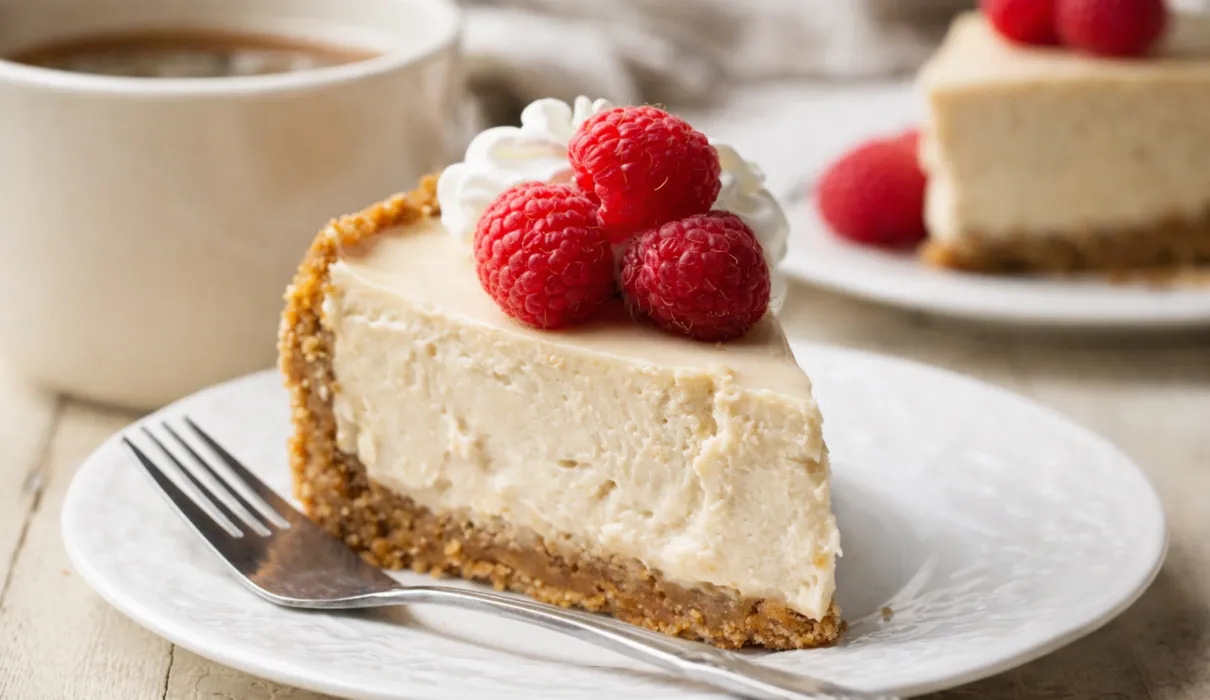
A dessert that doesn’t feel like a compromise 🍰
I still remember the first time I went fully vegan and tried to recreate cheesecake. I was excited… and then disappointed. It was either too grainy, too coconut-heavy, or tasted like sweetened tofu pretending to be dessert.
If you’ve ever missed that dense, creamy, melt-in-your-mouth cheesecake texture after cutting out dairy, you’re not alone. I wanted something that felt indulgent, not “good for a vegan dessert.” Something you’d proudly serve to non vegans without explaining yourself.
After a lot of trial and error (and a few fridge failures), this vegan cheesecake became my go-to. It’s rich, smooth, no dairy, and honestly just feels like the real thing.
Quick Summary
- Creamy, rich vegan cheesecake with zero dairy
- No bake option included
- Uses simple whole food ingredients
- Prep time about 25 minutes, chill time 4 to 6 hours
- Roughly 320 to 350 calories per slice
- Perfect for vegans and non vegans alike
Why Vegan Cheesecake Works So Well
A good vegan cheesecake isn’t about copying dairy. It’s about using the right plant based fats and textures.
The magic usually comes from:
- Cashews for creaminess
- Coconut cream for richness
- Lemon juice for that classic tang
- A proper crust that holds everything together
When blended correctly, these ingredients don’t taste “vegan.” They taste like dessert.
In my experience, the biggest difference between an okay vegan cheesecake and a great one is patience. Soaking cashews properly and blending long enough makes all the difference.
Ingredients You’ll Need (Simple and Accessible)
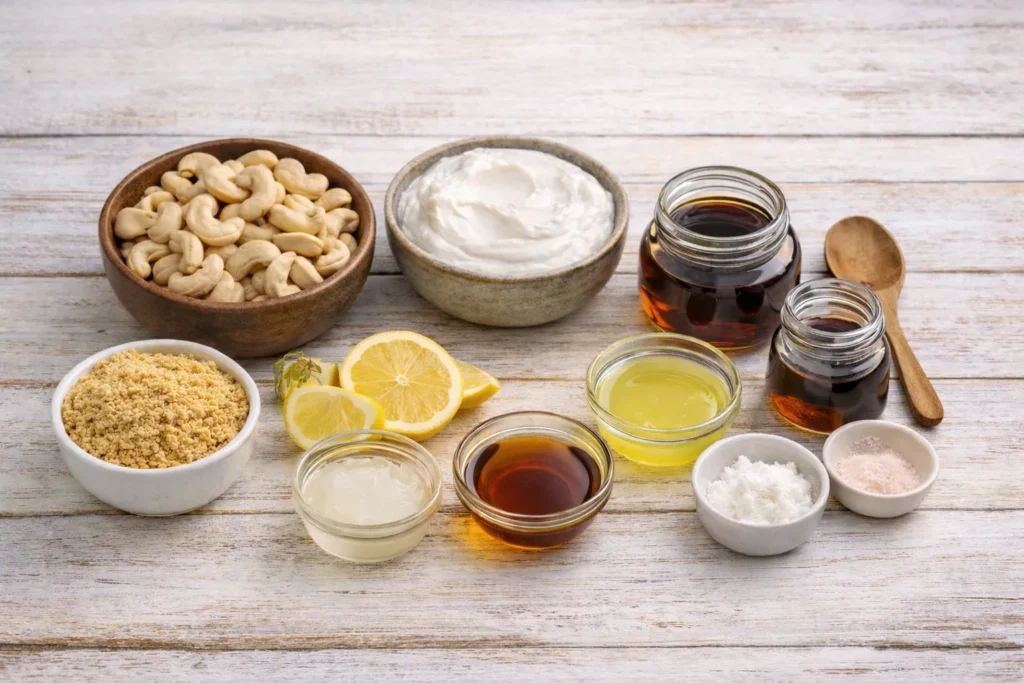
For the crust
- 1 ½ cups crushed digestive biscuits or graham crackers
- 3 tablespoons melted coconut oil
- 1 tablespoon maple syrup
For the filling
- 1 ½ cups raw cashews (soaked 6 to 8 hours)
- ¾ cup full fat coconut cream
- ⅓ cup maple syrup
- 2 tablespoons lemon juice
- 1 teaspoon vanilla extract
- Pinch of salt
Optional toppings:
- Fresh berries 🍓
- Vegan chocolate drizzle
- Fruit compote
Step by Step Vegan Cheesecake Method
Step 1: Prepare the crust
Crush the biscuits until fine. I usually use a food processor, but a rolling pin and zip bag work too.
Mix with melted coconut oil and maple syrup until it feels like damp sand.
Press firmly into the bottom of a lined 7 or 8 inch springform pan. Use the back of a spoon to pack it down well.
Place in the fridge while you make the filling.
Step 2: Blend the filling
Drain the soaked cashews and add them to a high speed blender.
Add coconut cream, maple syrup, lemon juice, vanilla, and salt.
Blend for 1 to 2 minutes until completely smooth. No grit. No lumps.
If needed, stop and scrape the sides, then blend again.
I’ve noticed that under blending is the number one reason people think vegan cheesecake “isn’t creamy.”
Step 3: Assemble and chill
Pour the filling over the crust and smooth the top.
Tap the pan lightly on the counter to release air bubbles.
Chill in the fridge for at least 4 hours, ideally overnight.
For a firmer texture, you can freeze it for 2 hours, then let it sit at room temp for 15 minutes before slicing.
Nutrition Breakdown (Approximate Per Slice)
Based on 8 slices:
| Nutrient | Amount |
|---|---|
| Calories | 330 kcal |
| Protein | 6 g |
| Fat | 24 g |
| Carbs | 26 g |
This isn’t a low calorie dessert, and it’s not meant to be. It’s satisfying, filling, and you don’t need a huge slice to feel content.
Baked vs No Bake Vegan Cheesecake
Most people prefer no bake, and honestly, so do I.
No bake pros:
- Creamier texture
- Less chance of drying out
- Faster prep
Baked version (optional):
- Bake at 160°C (320°F) for 45 minutes
- Chill completely before slicing
- Slightly firmer, more classic style
If it’s your first time, I recommend no bake. It’s more forgiving.
Common Mistakes to Avoid 🚫
Not soaking cashews long enough
Hard cashews equal gritty cheesecake. Minimum 6 hours or quick soak in hot water for 30 minutes.
Using light coconut milk
You need fat for creaminess. Always use full fat coconut cream.
Skipping the lemon juice
This adds balance. Without it, the cheesecake tastes flat.
Rushing the chill time
It needs time to set. Cutting early leads to a soft center.
Personal Advice From My Kitchen
I’ve made this cheesecake for birthdays, family dinners, and even skeptical friends who “don’t like vegan desserts.” It’s one of the few recipes I trust without tweaking every time.
I recommend making it the night before you need it. The texture improves overnight, and the flavors settle beautifully.
Also, don’t overload it with toppings. A simple berry topping lets the cheesecake shine.
Practical Tips You Can Use Right Away
- Use a springform pan for clean slices
- Warm your knife under hot water before cutting
- Freeze leftovers in slices for easy desserts later
- If your blender struggles, add 1 to 2 tablespoons plant milk
FAQs About Vegan Cheesecake
Is vegan cheesecake healthier than regular cheesecake?
It depends. It’s dairy free and cholesterol free, but still calorie dense. Think of it as a better ingredient dessert, not a diet food.
Can I make this nut free?
Cashews are key for texture. Nut free versions exist, but the texture will be different.
How long does vegan cheesecake last?
Stored covered in the fridge, it lasts 4 to 5 days. Frozen, up to one month.
Can I reduce the sweetness?
Yes. Start with less maple syrup and adjust to taste after blending.
Why This Recipe Fits a Vegan Fitness Lifestyle
As someone who trains regularly, I like desserts that feel satisfying without triggering a binge. This cheesecake is rich enough that one slice is enough.
The healthy fats help with satiety, and the moderate protein from cashews is a nice bonus.
I’ve noticed that when I allow myself enjoyable treats like this, consistency with training and nutrition becomes easier.
Final Thoughts 🍰
Vegan cheesecake doesn’t need to taste like a compromise or a science experiment. With the right ingredients and a little patience, it can be just as creamy, rich, and comforting as the version you remember.
Take your time, enjoy the process, and don’t stress about perfection. Like fitness, good vegan cooking gets better with practice.
Stay consistent, be patient with yourself, and enjoy the journey one slice at a time 💚